Terrain Binge

Posted: March 8, 2016 in Terrain Features, Uncategorized

I recently made up a number of terrain features to add to my games. I find it so much more satisfying to have some nice-looking terrain pieces in a game, and they are fun to make.

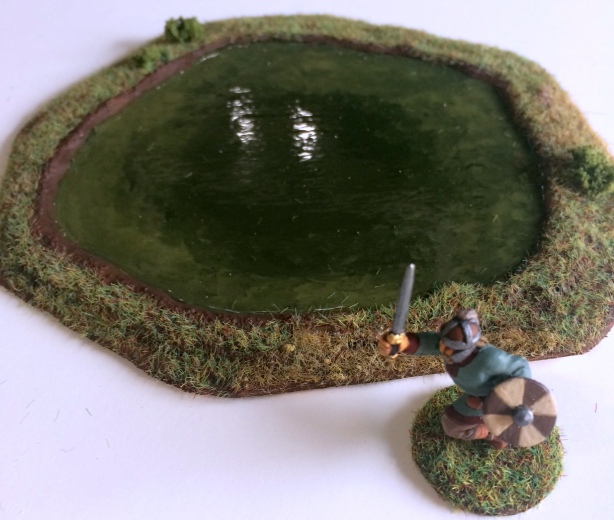
First up are two small pieces of broken or rough terrain. These are both roughly 6″ by 3″ and are based on thin sheets of plywood which have been cut to shape and sanded down. One of the pieces has a small pool of water made with Woodland Scenics Realistic Water. The rocks and wood were found in a field and I just left them their natural colors. I posed some 28mm figures next to them to give them some scale, but you could easily use this for any other scale.


Next up is a small pond made the same way, using the Woodland Scenics water. I’ve found that it looks best when you pour 2 or 3 layers on it, but you have to be patient because each layer takes many hours to dry. I really went nuts with this stuff, creating a bunch of river sections and going through nearly the entire bottle. The river is not quite finished yet, so I’ll include some photos in a later post.

Pond

Next are some farm fields. I made all of these using a hot glue gun to lay down the rows, then covered the entire field with a layer of sand. The enclosed field with a stone border was made by gluing pebbles together. The one with the wattle fence came from Renedra.

Next up is the forest. I don’t know about you, but when I see a piece of felt on the table with three trees on it, I have a hard time imagining that it represents a forest. I wanted to have something that indicated the density of forest while still allowing the players to easily move their units through it. Here’s what I came up with.

First, I created the base of the forest. This is a large piece of thin plywood that was 12″ x 12″ and then cut to shape and sanded. On this, I  put a layer of flocking (red flocking to represent dead leaves, then a layer of forest debris and underbrush). I was careful to make the flocking relatively light on the areas where the trees would be so as not to impede their placement. Around these areas I put some thicker brush, rocks, and fallen logs. When the stands of trees are placed, this debris will act as a kind of border and will (hopefully) add to the sense of density for the forest.

The trees were made with wooden dowels of various thickness, over which I made the “bark” with the hot glue gun, and then attached clumps of foliage from Woodland Scenics. The trees were then attached to four stands. Two of the stands were roughly 6″ x 6″ and the other two were about half that. The large stands got 6 trees each and the smaller ones got 3. The stands, in turn, got the same underbrush treatment as the base.

The result of this is that you can set the forest base down and set the tree stands on them. When troops move through, you simply remove tree stands. They also make nice scatter terrain on their own. I’m thinking of making at least 4 of these forest sections so that I cover a fairly large area.


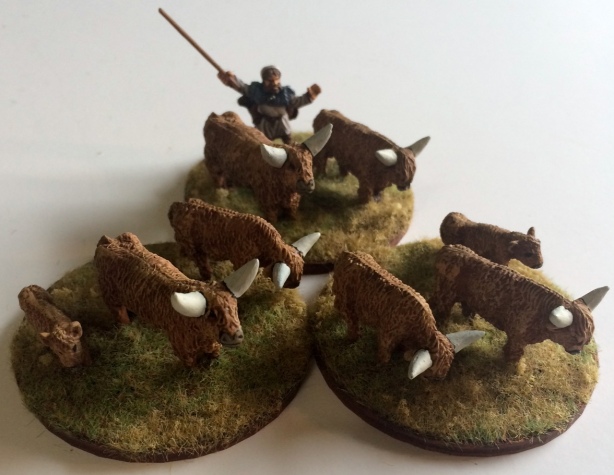
And last but not least, I have a herd of cattle, which is not really terrain, of course, but is a part of the landscape. I plan to use these for cattle raid scenarios as objectives. The cattle and herdsman are all from Gripping Beast.

Cattle Herd


Just a quick post to show my first unit of zombies that will be part of my undead army for Dragon Rampant. These will go together with the undead units shown HERE.

The bulk of the figures come from Mantic Miniatures Kings of War range, but I wanted to make them conform better with the Arthurian Age world of my historical miniatures. To do that, I’ve added a few bits and pieces from some other figures I have, mostly from the Gripping Beast plastic range. I wanted to have a few helmets, swords and clothing from some of the various nations of that period, but I tried not to go overboard with it. You be the judge of whether it works or not, and I do welcome critiques. I’m also using the same basing scheme as my historical armies, although obviously this one still needs to be flocked.

Dragon Rampant Zombies Front Dragon Rampant Zombies Rear


Also, here is the necromancer from the last post. This time, finally based.  If you’re playing DR, this little army will have the necromancer (Heavy Missiles + Summoner, Single-Figure Stand), three zombie units (Ravening Horde + Fear), and the vengeful spirits from last post (Elite Foot + Flying, Reduced-Figure Stand).


DR Necromancer I DR Necromancer II

DragonRampantCover

I consider myself more of a fan of historical gaming rather than fantasy, for the most part. But, having been a fan of Dan Mersey’s Dux Bellorum and Lion Rampant rules, I just had to get a copy of Dragon Rampant as well. Of course, I had to build an army to go along with it.

I wanted to get an army that would be compatible with my existing Early Dark Age army in terms of basing as well as period “feel”. This would not be easy as most fantasy figures look like they belong in a later period, such as medieval or later Dark Age, i.e., after the Vikings  show up. I settled on an Undead army to start with because I figured that I could go with zombie for the bulk of the warband and blend in a few period-specific elements like shields and helmets. We’ll see how the zombies turn out in a later post, but for now, here are a couple of my first units.

The first up is a unit of “Vengeful Spirits”. For those of you following along with your Dragon Rampant rule books, these guys are Elite Foot with the added attribute of Fear.

Undead I

Undead II Undead IIIThe spirit at front and center is a Reaper Bones figure and the two others are metal Reaper figures, while the gravestones are from Renendra. I debated whether to base them individually or on a multi-figure base, but decided on the latter. It fits with the basing scheme I’ve been using with my other Dark Age stuff, and I really like the freedom to create mini-dioramas that the larger bases give me. Obviously, this is what the rule book calls a “reduced model unit”, since there are only three of them, but I think a unit of ghosts looks better with fewer figures.

Next up is my Necromancer, although he still needs to be based. He, too, is a Reaper Bones figure.

Necromancer I

If you’ve never painted any of the Reaper Bones figures, it takes a little getting used to because they are soft, bendy plastic. But the detail is good and they take the paint well, so I’m hoping that the material translates into more durability on the tabletop. For his base, I’m planning a somewhat largish vignette showing him raising an undead thrall from the grave. I’ll post a photo of it when I’m done.

For the rest of the army, I’ve bought a big pile of Mantic plastic zombies and I’m currently in the process of mixing them with some Gripping Beast plastic parts as well as a few metal figures here and there. My goal is to make it look like it includes dead men from all four of my current armies: Roman, Sub-Roman British, Saxon and Pict. Fortunately, the Mantic zombies come with extra heads which will add a little uniformity to the whole mob. We’ll see how well it turns out, and I’ll post pictures of that when it’s ready.

Well, it’s been a while since my last post. Work has kept me insanely busy this past year. It was hard to find time, but I managed to paint a few things now and then. As part of my ongoing Dux Bellorum project, I’ve finally started building the Late Roman army and here are the first units. First up is the Roman general and companions.

These are all made by Gripping Beast. As with the previous units I’ve made to use with Dux Bellorum, these are all mounted on large 120mm x 80mm bases, which is my new favorite basing method. This represents the general himself and his security team of elite cavalry troopers. I’m trying to represent real units as far as possible, so the troopers carry on their shields the insignia of the Equites Honoriani Seniores, a unit which served in Britain during the later period. The general has a different shield because, well, he’s the general, and who’s going to tell him he can’t?

Next up is a unit of cataphracti, also made by Gripping Beast. This unit illustrates one of the reasons that I like these large bases and that’s because they allow me to create a more dynamic scene. As you can see, the troopers are jabbing their lances in a lot of different directions. If I had all of the horses going in one direction, it would look a little weird with those lances swinging all around. So, I opted to have the lances going in one direction and the horses going in different directions. To me, it looks like they’ve just charged into contact with an enemy in front of them and are just now breaking to their right to ride away. There’s no evidence that cataphracts served in Britain, which is the setting for my Dux Bellorum games, but it’s possible that they might have been there for short campaigns or operations now and then.

Next up are the poor, bloody infantry. If you’re not familiar with the Romans of the late period, these aren’t exactly the barbarian-killing supermen that their great-grandfathers were. These guys are mostly conscripts, not as well-trained nor as well-equipped as their ancestors, and often were forced to go without pay. On the battlefield, they were mostly expected to stand in one spot while the cavalry did the major work. Despite these handicaps, the Roman infantrymen managed (usually) to keep the constant waves of barbarians in check and were capable of occasional acts of great courage.

I tried something different with the infantry troopers. I wanted to have oversized units, so I packed 18 men onto one stand rather than my usual 12. I plan to have a total of 6 units of Roman infantry (3 armored, 3 unarmored) and I want it to look like a solid mass of men when placed side by side. Numbers like that don’t come cheap, so I decided to get my money’s worth by using plastic troops. ‘But wait’, I hear you saying, ‘Nobody makes plastic Romans’. That’s true, but they come close. I used a box of Gripping Beast Saxon Thegns for the armored guys and GB Dark Age Warriors for the unarmored. I replaced their round shields with oval ones, also from Gripping Beast. The heads come from West Wind Production’s Sub-Roman heads, although I kept a few Germanic helmets here and there to reflect the troubles they had with supply. The trickiest part of the conversion was removing the big crucifixes that the thegn bodies were wearing around their necks. By the way, if you’re trying to remove those on your own troops, the technique I settled on was to carefully slice away the crosses with an Exacto knife, then (and this part makes all the difference) used a pin vice to drill out a few tiny holes in the cross-shaped bare patch on the front of the chainmail. If done right, you can’t even tell that there was ever a cross in the first place. The front rank of the unit, which is kneeling, is entirely from Footsore Miniatures (formerly Musketeer).

As with the cavalry, I wanted to go with a real regiment, so I painted the men in the colors of the Secunda Britannica, a legion that served in Britain at the same time as the Equites Honoriani Seniores shown above.

In addition to the regular troops, Dux Bellorum allows you to add special units as purchasable “strategy & tactics” options, so I made a few of those. The first is a bunch of praying monks to beseech divine support for your little army. These are all Gripping Beast.

The second is a pack of war dogs and their handler. I imagine them as itinerant dog handlers who hire their services out to the highest bidder. It’s a family business, and the old man is showing his son the ropes before eventually turning over the keys to him and retiring to southern Italy, or someplace else that’s warm and hopefully free of invading enemies.

The dogs  and the younger man are from Gripping Beast, and the old man is from Foundry. The dogs looked like Scottish Deer Hounds to me, so I tried to paint them that way.


To go along with my growing Dark Age forces, I decided to make a “town” terrain feature for the boys to fight over. But I thought that if I made it look like a small section of a full-sized town, it would just look too unrealistic. Towns are big, sprawling things and you’d need at least a full table for it to make sense visually. But I thought a single homestead would make more sense on the table and still convey that this is “urban” terrain.

I consider this a kind of first draft of a terrain piece. I’m looking at it and seeing things I’d like to improve. So, I still may make some changes or additions to it.

I started with a piece of thin plywood that measured 24″ x 12″, and I sanded down the edges so they wouldn’t appear so obvious when set up on the table. I glued down the outer wall, which is made from two packs of Renendra picket fences. I tried to set it up in such a way that I could comfortably place my infantry units along the edges to defend it. Then I painted it and added ground cover. The two structures are resin dark age buildings by Gripping Beast. I placed them both on their own bases so that I can remove them when troops occupy the terrain feature.

DAB5

DAB4

DAB3

DAB2

DAB1


9781849086806

My friend Francisco and I have been playing Dux Bellorum about once a month, and we recently tried the scenario “The Bard’s Tale”. If you’re unfamiliar with the rules, this scenario is pretty standard except that both sides have a bard with their army, and victory is determined by the glorious acts of heroism he witnesses. Think of the bard as the Dark Age equivalent of an imbedded reporter, bearing witness to the battle for the benefit of the folks back home. Forget all the usual things about winning and losing a battle, they don’t matter here. All that matters is how much (or how little) glory the bard witnesses.

In the scenario, each player attaches his bard to a unit at the beginning of each turn. While he is attached, the player gains points for whatever happens to the unit, both good and bad. Think about that for a second, because it dramatically alters the way the game is played. Even if the unit is wiped out you get points, and the more spectacular the battle the more points.

I had the Saxons and was the repeller, with the following forces:

1 x Leader and Foot Companions

1 x Noble Warriors

5 x Ordinary Warriors

2 x Skirmishers (with bows)

1 x Fanatics

Saxon left wing. The fanatics are way out at the far end

Saxon left wing. The fanatics are way out at the far end

Saxon right wing. Leader & companions are in the center of the line

Saxon right wing. Leader & companions are in the center of the line


Francisco had the Romano-British and was the attacker, with the following forces:

1 x Leader and Mounted Companions

2 x Noble Riders

1 x Noble Shieldwall

3 x Ordinary Shieldwall

He also chose the “Imposing Horses” strategy for his force, giving his cavalry an attack modifier when charging.

British right flank - The shieldwall

British right flank – The shieldwall


British left flank - The cavalry

British left flank – The cavalry

The terrain was nothing special, just a small patch of woods on the left and the right with an old Roman road running down the center. The Romano-British started the game by slowly moving both flanks forward. The Saxons responded by moving their left flank, including the fanatics, forward into the woods directly in front of them while the skirmishers on the right headed for the other patch of woods.

The Saxons

The Saxons

British start position

The British

The British shieldwall approaches

The British shieldwall in the distance approaches

As the lines came closer, the fanatics on the Saxon left charged out of the woods at the nearest British unit with bloody results. The fanatics were wiped out, but the fury of their assault inflicted casualties on the shieldwall, weakening it. This was where I made my first bard-related mistake. Instead of placing him with the fanatics where he could witness the glorious charge, I placed him with one of the warrior units that I thought would be in combat. I was wrong. No points awarded.

The fanatics charge out of the forest.

The fanatics charge out of the forest.

By the way, in the photo you see, the individual command figures on small square bases represent “Leadership Points”, which gives the unit certain benefits in combat. The bards are also on square bases. Wherever you see casualties on round bases, these represent cohesion losses.

At the same time that the fanatics were making their heroic but unwitnessed charge, the British cavalry at the other end of the line charged forward and smashed into the Saxon line.

British cavalry charge

British cavalry charge

The cavalry certainly put a dent in the line of Saxon warriors, but were mauled in the process, taking many casualties before falling back. It’s good to note here that cavalry of this period, although powerful, were not the panzer-like monsters that later knights would be. In this period, the mostly threw javelins rather than charging home.

British Shieldwall

The push and pull of battle began to break apart the lines into a series of fights between individual units.

Saxon king

Saxon king

British Initial Charge

Losses begin to mount

Losses begin to mount

Saxon King Awaiting

Francisco and I started to get the hang of putting the bard where the action was going to be. As units began to crumble and rout off the table, we both racked up a lot of bard points.

The Saxon king and companions was pummeled by repeated charges back and forth. One more cohesion loss would destroy the unit.

The dead cover the field

The dead cover the field

British units now began to back away, not wanting to add victory points. The Saxon skirmishers who had been shooting into the British left flank, now fell silent less they kill off the remaining British cavalry (Archery adds nothing to bard points since there’s no glory in it).

Finally, the Saxon king managed to charge forward in one last, glorious, bloody charge attended by the Saxon Bard. He was killed in the process, but managed to take out another British unit. The rest of the Saxon line surged forward, causing even more losses among their foes.

Saxon King Charges

With so many dead, both armies now had to check morale and it was the British that broke, leaving the field to the surviving Saxons. However, we counted the points and found that the British had far more than the Saxons. In a finale reminiscent of the Welsh poem “Y Gododdin”, their bard came away with a tale of glory mixed with tragedy.

Three hundred gold-torqued men attacked,
Guarding their land, bloody was the slaughter,
Although they were slain, they slew;
And until the end of the world they will be honoured.
And of all of us kinsmen who went together,
Sad, but for one man, none escaped.

                                                                    – Y Gododdin


Early Saxon Warband

Posted: December 4, 2014 in Ancients, Dark Ages

This is a continuation of my Dux Bellorum project. After having completed the Sub-Roman British, I’ve now moved on to the dreaded Saxons. 

First up is the warlord himself, along with his companions. Surrounded by his fiercest and most trusted warriors, the warlord has struck down another enemy. To his left, his scop weaves a verbal tapestry of obscene insults aimed at the enemy nobles. To the warlord’s right, his wizard casts spells to confuse and frighten the enemy.

Most of these are from Gripping Beast, but the wizard and scop are by Musketeer. Rather than use banners, I decided to go with animal skulls as standards. As one of the last pagan german tribes, I wanted to give the Saxons a primitive look to contrast them with their sub-Roman enemies. I’m not sure that’s entirely accurate from a historical standpoint, though.

Saxon Warlord I

Saxon Warlord II

Next up are the “noble warriors”. These would be the Gesith or possibly the Duguth warriors, with better armor and more experience than the average men. These are also from Gripping Beast:

Saxon Gesith I

Saxon Gesith II


A bit further down the totem pole are the “ordinary warriors”. These are by far the most numerous troops in the Saxon force, but so far I’ve only got a few units finished. They are a mix West Wind, Old Glory and Musketeer figures:

Saxon Duguth I - Copy

Saxon Duguth II - Copy

I’ve given my Saxon army two skirmisher units armed with bows. In my basing scheme, I’m putting skirmish units on smaller bases. (120mm x 40mm, as opposed to 120mm x 80mm for non-skirmish units). These are all Musketeer figures:

Saxon Skirmishers


Finally, I’ve made a unit of “fanatics”. As stated in the Dux Bellorum rule book, there isn’t much historical evidence for their existence, but gives the player the option to have a unit of them anyway. That’s good enough for me, and I figure that I can always opt to play them as ordinary troops if I want to. These are Gripping Beast with a couple of Old Glory figures. I did a slight bit of converting on one of the men in the rear to have him swinging a victim’s head.

German Fanatics


The next army in this series will be the Picts, which I’m painting at the moment. I’ll be sure to post photos of those after I’ve finished a few of units.


Canaanites and Sea Peoples

Posted: August 22, 2014 in Ancients, Uncategorized

After putting together my Dark Age forces on Impetus-style bases, I realized that I really like the look of them, and so I decided to base the rest of my ancients the same way. I like the consistency of having them all based the same way, and I can use them for a variety of different rules. Right now, one of the rules I play is Hail Caesar, and this works just fine for that. I’m also thinking that I can adapt the Dux Bellorum rules for other periods, so this should work either way.

The first of the ancient units I based this way were my Canaanites and Sea Peoples. Eventually, I’ll get my Egyptians finished to join them. First up is the Canaanite king and retainers. This could also serve as an elite unit of household spearmen. All of the figures in this unit are Wargames Foundry.

Canaanite King's Guard

And here is a unit of ordinary spearmen. These guys are by Cutting Edge. I really like the Cutting Edge figures, but I found that they don’t all match up well with the Foundry Canaanites. They tend toward the small side in comparison.  The army looks just fine if I segregate them into their own units, however:

Canaanite Spearmen I


Next up are some Canaanite skirmishers, a unit of slingers and a unit of archers. These are all Cutting Edge. I’m putting the skirmish units on bases with half the depth of other units in order to distinguish them.

Canaanite Slingers

Canaanite Archers


If I want to use these to play Dux Bellorum, I have to have something to represent leadership points. Rather than using poker chips or dice to mark them (which I hate), my solution is to use command figures, as I pointed out in the Arthur Rex posts. I think it looks more “organic” on the table that way. I made up several for both armies, and they can double as command units when playing with another set of rules. Here are some of the Canaanite leadership points,all of which are Foundry figures. I put them on square bases to distinguish them from the casualty markers.

Bronze Age Leaders


And here are the casualty markers. Most of these are from the Old Glory Trojan Wars casualty pack but converted with head swaps.

Bronze Age Casualties

Now we come to the Sea Peoples invaders. The first unit is mostly Old Glory (One has a head swap and is waving his helmet). The rest are primarily Foundry, with a couple of figures from MDS scattered around.

Sea Peoples Infantry II

Sea Peoples Infantry I

Sea Peoples Infantry III


Last up are the Sea Peoples’ chariots. I had some chariots already in the lead pile just begging to be used for something, and I bought a bunch of crew members for them. I used Castaway Arts because they were the only figures I could find with a small enough stance to fit into those narrow cabs.

Sea Peoples Chariots

Here is the third post in the series (Following Part 1 and Part 2 ) as I slowly build my Romano-British army for Dux Bellorum. This time, I’ve got the infantry to show.

First up are the “ordinary shieldwall” units. I like using the 120mm x 80mm bases for this because I don’t need to worry about swords and spearpoints getting snapped off during a game because they don’t extend beyond the front edge of the stand. This also makes it easier to store them as well.

As you can see, the ordinary shieldwall as not particularly well armored, and I used a mix of troops in order to give an irregular look. These guys are definitely not regulars. They’re farmers and fishermen with whatever armor and weapons they can find, kept together by a few junior officers.

Shieldwall 2


Shieldwall 1


Shieldwall 3


Next up is a unit of “noble shieldwall”. These men have much better armor than the other men, but their role is the same. These men group together with the rest of the shieldwall to form an unbreakable defense line (or so it’s hoped). These are the anvil while the cavalry shown in the earlier posts are the hammer.


Noble Shieldwall


This basically completes the Romano-British army, at least enough to play a game. It’s a small army, with only three cavalry, including the commander’s unit, and 4 infantry. I have enough points to add another unit or some skirmishers, but these points can also be used to “buy” some of the special strategies in a game. Eventually, I plan to expand the armies I build so that I can use them with other rules such as Hail Caesar and Impetus.

In addition to the actual units, I’ve also created some markers for the game. Rather than using dice or poker chips, I like to use markers that look like they are organic to the action. So, the first shot here is of some Saxon casualties (To go with the upcoming Saxon army) used to mark hits on a unit. These are from a pack of Old Glory casualties from the “Somerled the Viking Slayer” range. They’re really supposed to represent a later period than what I’m working with, so I made some minor conversions to let them fit in a little more. I changed some of the helmet types as well as a couple of head swaps. You get 20 casualties in a bag for a low price, and they are not bad sculpts at all, so it’s a pretty good deal.

Saxon Casualties


Last up is what I’m using to represent Leadership Points (LPs). Basically, I’m using command figures, but I differentiate them from the casualties by putting them on square bases. So, for example, if you see an enemy unit with three figures standing next to it, that unit has 3 LPs.

This figure is from West Wind. I need 6-9 markers for each army, so I’m going to also use the Musketeer Miniatures Arthurian character figures for this. The bonus to this method is that I can simply use them as command figures if I play another set of rules. I’m all about flexibility!

British LP


The next army in this series will be the Saxons. I’ve already finished some of the Saxon army, so hopefully I’ll post those shots next month. See ya then!


At this point, I’m still hard at work building my Dark Age forces for Dux Bellorum. But, I wanted to play with the rules a bit, so I used some proxy armies to stand in until I finish, and played a game against my son, Danny. This was the first game for both of us.

The armies I chose were already based on Impetus-style stands, and were Ancient Canaanites and Sea People. The composition of the two proxy armies were close enough to those of the Dux Bellorum army lists that I could use them with very little adaption. So, the Sea People became my virtual Irish (My son’s command) and the Canaanites became Romano-British (My troops).  For this game, we did not use any of the built-in strategies and tactics except for giving the Sea People the Chariot option (Because that’s what they had). Also, I fudged the list a bit by giving the Canaanites an extra skirmish unit. The Sea People army, thus was composed of 3 chariot units (including the general), 5 ordinary warriors, 1 skirmish unit with bows, and another with javelins. The Canaanite army had a foot companion, 3 noble shieldwall units, 3 ordinary shieldwall, and 3 skirmishers. The Canaanites were the repellers, so I set them up in two main groups, with the general plus 2 shieldwall occupying a hill on the right and the three remaining shieldwall set up on some open ground on the left, facing a small patch of forest. The skirmishers were spread out more or less evenly across the front. The Sea People set up in three groups: One large group of of 3 warrior units on their left facing the hill, and two warrior units plus both skirmishers in the patch of woods to their right. The chariots hung back menacingly in a group near the center behind the main line of warriors.

On turn 1, the Sea People began to move forward. The large group of warriors on the Agressors’ left made good progress, and the skirmishers emerged from the woods. However, one of the units of warriors in the woods failed their bravery test and wouldn’t budge. In response, the Canaanite skirmishers ran forward to shoot missiles at the enemy while the two shieldwall groups held steady.

Turn 1ATurn1B


By Turn 2, the skirmishers of both sides were within missile range of their enemy and a very spirited exchange ensued. Danny’s main group of warriors moved forward toward the shieldwall occupying the hill, but he kept the chariots back, out of range. However, the unit in the woods failed another bravery test and he decided to move its partner unit to the edge of the woods and no farther until he could get the reluctant warriors moving to join them. Casualties began to mount among the skirmishers of both sides.

Turn 2


By turn three, the main group of Sea People warriors were now within charge range of the hill. A unit of their skirmishers were driven off, however, and now Canaanite missiles were beginning to fall among the formed troops. Danny now spent extra leadership points to boot his reluctant warriors on the right forward, trying to get them lined up with their sister unit holding the edge of the woods. The Canaanite shieldwall continued to hold their position. I wasn’t about to give up the advantage of the hill.

Turn 3


On turn 4, the Sea People infantry charged up the hill and crashed into the shieldwall. There was a vicious battle here, with both sides taking casualties, although the Canaanite defenders were obviously coming out ahead in the struggle. The warriors in the woods were now lined up and ready to move forward. The chariots still did not enter the fight, but shifted position slightly to face the shieldwall down on the open ground and move within charge range. Most of the skirmishers on both sides were now gone, leaving the fight to the bigger formed units.


Turn 4


On turn 5, the chariots, including the Sea People general, rolled forward and crashed into the shieldwall roughly in the center of the Canaanite line. On the hill to the chariots’ left, the battle raged and a few units on both sides were now within one cohesion point of breaking.

Turn 5

Finally, on Turn 6, two Canaanite units broke and ran, opening two big holes in the line. Danny quickly took advantage of this to push his troops into the gaps and to wrap around the men still remaining. The shieldwall down on the plain held firm, but the line on the hilltop was in tatters.


Turn 6


By turn 8, the Canaanite general lay dead with his men on the hill, and army took a morale check. The men on the plain continued to hold, although the hill was now swarming with enemy warriors and they were now outflanked. It was at this point that they still-unbloodied Sea People warriors found the bravery to finally advance out of the woods toward them. It was at this point that we decided to call the game a Sea People win.

Turn 8

Both of us enjoyed the game. The rules were simple enough that we eventually both stopped looking at the charts because we could tell what the combat modifiers would be at a glance. Armies are small, as well as the table itself, and this ensured that the game moved forward rather quickly. It’s worth noting here that this game was helpful in getting us acquainted with DB’s Leadership Point rule, and we were both able to clearly see that there is a certain amount of nuance involved with their use. During the early turns, we distributed the points to the skirmishers, mostly, to reduce casualties from missile fire as well as to try to maximize our own fire. Danny discovered that the LPs are essential to getting your line moving together, so he diverted a significant number toward boosting the bravery checks of the warriors stuck in the woods. Finally, during the big melees when the lines came together, LPs were now mainly used to add to the attacks (For the warriors trying to break the line) or to reduce hits received (For the shieldwall trying to hold the line). It became evident to both of us that using LPs required some care and that a mistake in how and where you spent them could mean the difference between victory and defeat.